Creating nice sheet music from GBA soundtracks, part 1
🎵 loading …
Who is this tutorial for? I mean, who else owns this specific version of the quite expensive program Sibelius (to be precise, the 2018 edition), knows the principal rules of music engraving, and is interested in (points at title) creating nice sheet music from GBA soundtracks? Me. It’s me. This is so I don’t forget how to do this.
Ok, unfortunately you need to use Windows for this. First, download GBAMusRiper and the .gba rom you’re ripping from. Put them in a folder together, open up PowerShell and navigate into it, then run .\gba_mus_riper [ROM].gba. This creates a new folder with all the midi files inside, as well as a .sf2 file, which is apparently a soundbank. I don’t know what that is, but I think it’s the thing those people on YouTube use to make this stuff.
I’ve been mostly doing this with FF6 so far, but for the purposes of this guide I’m using a Pokémon Emerald rom, which will be interesting because a lot of the instruments in the Pokémon games are less realistic so I’m going to have to make actual Creative Decisions about how to represent them. I don’t need to worry about that until later anyway! I’m going to do Route 113, for the sole reason that it’s a banger.
A lot of the tracks in the folder are just junk. I got 609 tracks and there definitely aren’t that many in the Pokémon RSE OST, lol. Sort them by size and delete any that are a couple of kilobytes or less because they’re probably just sound effects. Having done that I now have 193 tracks, which is still a lot. Some of them could be duplicates and maybe some could be meant to be layered over each other? FF6 definitely didn’t do that but who knows what Pokémon does.
After opening loads of the files I’ve established that the one I want is song418.mid. This is where I open the file in Sibelius. Change some of the notation settings in the import dialog, otherwise there may be issues regarding tuplets crossing barlines if there’s an upbeat bar. Set the shortest note to the smallest available value i.e. a demisemiquaver.
When we open the file, it looks like this:
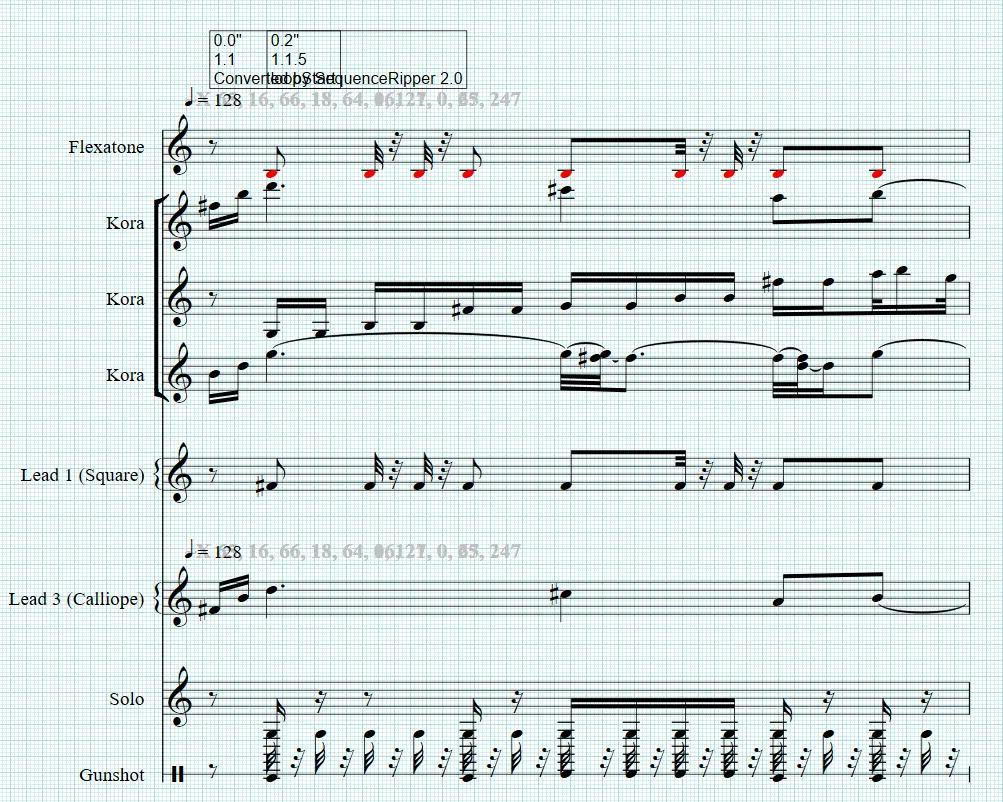
And it sounds, I’m afraid, like this:
It’s pretty terrible for now. Fear not!
First thing to do: structural edits. This one is in 12/8 but Sibelius has assumed 4/4 here. It’s also supposed to start with a quaver upbeat, but Sibelius assumes it starts at the beginning of a bar. Change the time signature to 12/8 with a quaver upbeat (via Time Signature > More Options). Then cut and paste all the music back a quaver. We might as well also set the key signature (B minor) at this point.
Most game tracks loop; those boxes in the image tell us where the loop starts and ends. The first box is the beginning of the track, the second is the start of the loop, and there’ll be one at the end for the end of the loop. We can put in repeat signs where the loop starts and ends, and then go to Edit Hit Points (alt-shift-p) and click Delete all to get rid of the boxes. Also delete any MIDI messages here (the lists of numbers in bold). Make sure View Hidden Objects is turned on so you can see where these are.
Next we need to quantise everything manually. Go through each instrument track and listen to it – then edit it so that what you see matches what you hear. This will mostly affect rhythms, but you can also do dynamics and enharmonic notes at this point. Some notes may be almost inaudible – they’re just there for an echo effect. You can just get rid of those.
Here’s how the timpani part looks to start with:
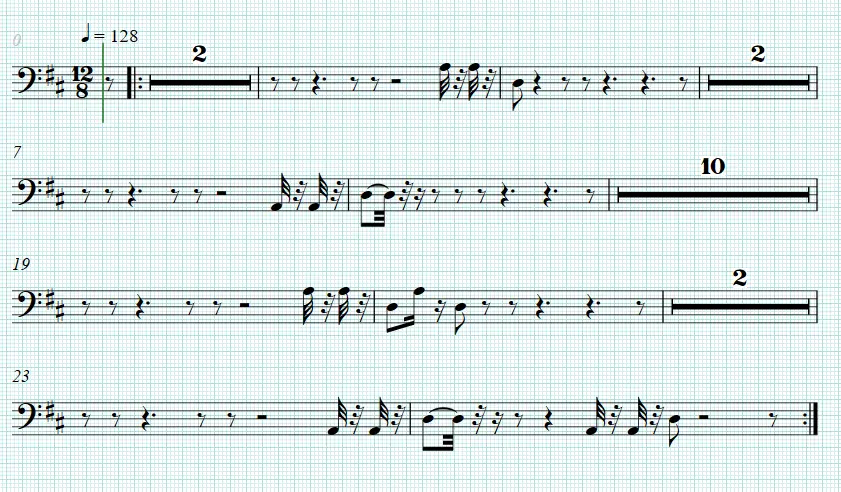
And here it is afterwards, much more normal looking:

Some of the instruments will sound very weird – NotePerformer always makes synths really out of tune for some reason – so just replace them with pianos if so.
These are the kind of things that can come up during this process (and did, in this example):
- Short notes – can often just make these staccato;
- Written out acciacciaturas need to be made into real ones;
- Tuplets need to be written out properly.
The track marked “Solo” is clearly a percussion track because it doesn’t fit harmonically with the rest at all, so I’ll change that to “drum set” for now and deal with the actual instruments once I compare this with the real thing.
Once all that’s done, select everything, open the inspector (ctrl+shift+i) and under Playback, uncheck Live velocity, Live start position, and Live duration.
This is now what it looks like:
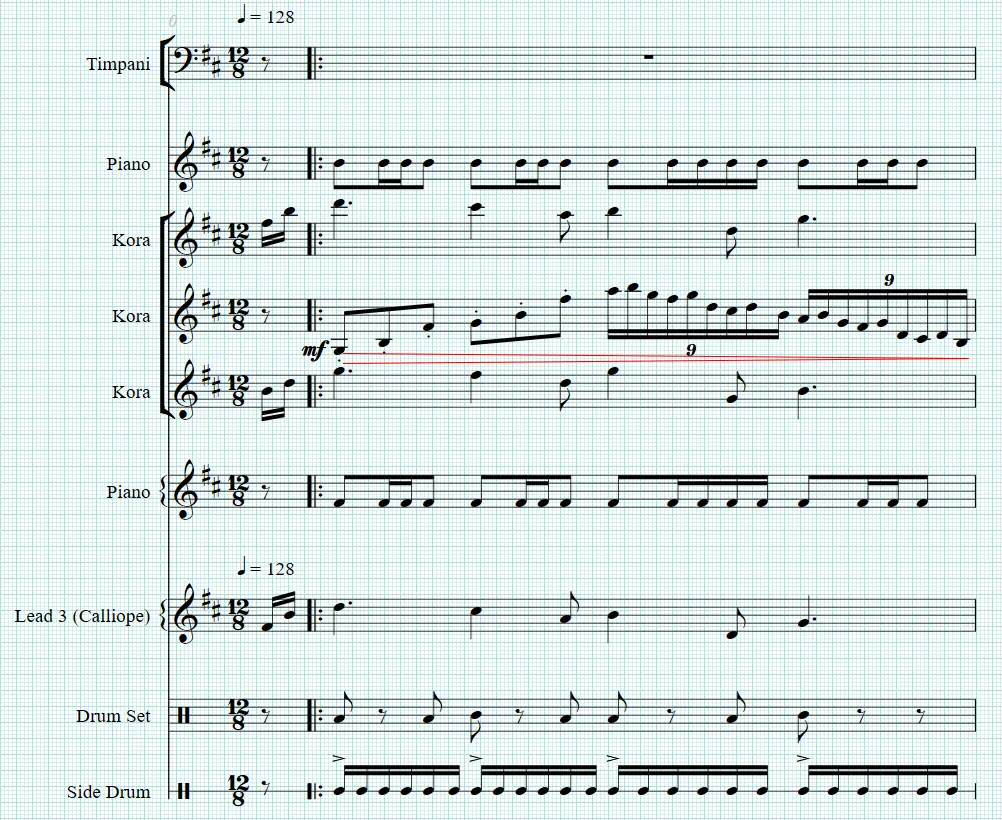
And this is what it sounds like:
This is closer to what it should be! More to follow.